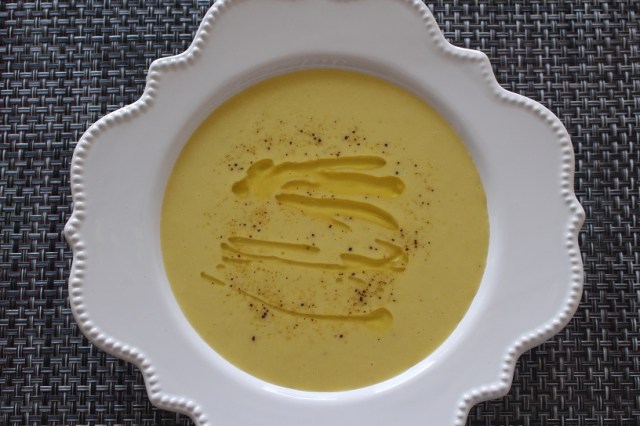
Corn Truffle Soup (Served Hot or Chilled)

IMG_2995

©2017 Food Cookture – Corn Truffle Soup

My husband and I attended a friend’s wedding last summer at the Four Seasons Hotel in Boston, and needless to say the food served during dinner was outstanding. One of the items on the tasting plate was a “sweet corn truffle soup” that I couldn’t wait to make at home, since I love the combination of corn and truffles, but had never made them together as a soup.  There is no need to add cream to this recipe since the soup is very silky and creamy on its own, once the corn is blended and strained.  You can use either fresh or frozen corn, of course fresh will taste better and if cooked on the cob will be even more flavorful.  Please be sure your corn is organic and non-GMO (genetically modified organism), since unfortunately, corn t is one of the most “genetically modified” foods on the market.

Corn Truffle Soup (Served Hot or Chilled)
Serves: 8
Prep time: 5-10 minutes
Cook time: 20-25 minutes, plus straining

Ingredients

  • 2 pounds (700g) of organic, non-GMO sweet corn (fresh or frozen; if using fresh, you can cook the corn on the cob for more flavor – weight noted is without the cob)
  • 1 medium onion, chopped
  • 2 garlic cloves, minced
  • 2-3 TBL olive oil
  • 2 TBL butter (optional, or add more olive oil)
  • Approximately 6 cups (1.5L) of liquid – any combination you prefer between water and organic vegetable stock (I prefer using more water and seasoning with salt and pepper for a more delicate flavor).
  • Salt and pepper to taste
    • Note: if using truffle salt to serve, use less salt/vegetable stock
  • Truffles for serving:
    • You can use any combination of white or black truffle salt, white or black truffle oil, and/or fresh/raw shaved white truffles (if using fresh truffles then use white truffles as fresh black truffles are better when cooked). For this recipe, I always use a dash of black truffle salt and a drizzle of white or black truffle oil right before serving.

Directions

  1. Sauté the onions in olive oil and butter until translucent. Add the garlic until cooked.
  2. Add the fresh corn on the cob or the frozen corn and stir. Immediately add the liquid (water/vegetable stock), cover the pot and cook for approximately 15-20 minutes in medium-high heat, until the liquid boils and the corn cooks through until it is soft (best for blending). If using fresh corn, after cooking cut from the cob and put corn back in the pot, discard the cob.
  3. Season with salt and pepper (if using truffle salt to serve, use less salt to season the soup)
  4. Use an immersion blender (or allow the soup to cool and use a high-speed blender) until smooth.
  5. Strain the soup and it is ready to serve. This soup can be served hot or chilled.
  6. Once plated and ready to serve, sprinkle a dash of truffle salt, and/or a drizzle of truffle oil, and/or shaved fresh white truffles on top.

I hope you enjoy this delicious and healthy soup, hot or chilled, year-round!

Posted in Appetizers, Brunch/Breakfast, Entree (lunch/dinner), First Course, Gluten-Free, Healthy Cookture, Light Dishes, Side Dishes, Snacks, Soups, Vegan, Vegetarian | Tagged , , , , , , , , , , , , , , , , , | Leave a comment

Super Healthy Muffins (High Protein, Gluten-Free)

Super Healthy Muffins

©2017 Food Cookture – Super Healthy Muffins

My friend Gabi sent me a simple, gluten-free muffin recipe, knowing I would love it – and she was right! But I also love tweaking recipes to make them even healthier, when possible.  So for this recipe, I added an extra banana to make it into a “banana muffin” (for a subtler flavor, remove 1 banana from the recipe) and added lots of extra nutritious ingredients (hemp seeds, turmeric, nuts, oats) to make it even more of a guilt-free treat.  I also substituted honey and maple syrup for the sugar and added spices to “sweeten” the flavor without adding extra sugar.  My friend’s recipe called for apple-cider vinegar and baking soda as the leavening agent, but I substituted them for baking powder.  If you use vinegar + baking soda as your leavening agent, you need to bake the batter right away.  Since I often bake 2 separate batches, my batter sits for a while, so in this case it’s always best to use baking powder since it’s a more stable leavening agent and can stand to wait a little before baking.  The original recipe called for 1 ½ cups of almond butter, I mixed it up by adding almond meal, oats, hemp seeds and walnuts to the almond butter for extra flavor.  I tried adding some protein powder to one batch but I could taste it in the muffin and didn’t like it, so I’ve added other good sources of protein, but feel free to experiment, this recipe is very flexible.  You can also substitute peanut butter for the almond butter and add raisins or chopped prunes, or even chocolate chips if you need it to be a richer treat.

Super Healthy Muffins (High Protein, Gluten-Free)
Yields: 2 dozen muffins
Prep time: 10 minutes
Cook time: 15 minutes
Temperature: 400◦F (200◦C)

Ingredients

  • 3 bananas, mashed (use 4 if you want banana muffins)
  • 3 large eggs
  • ½ cup of almond meal (ground almonds)
  • ½ cup of almond butter
  • ½ – ¾ cups of walnuts, in pieces
  • ½ cup of oats (gluten-free, steel-cut, not instant) – ground/powdered to use as a flour, plus extra whole oats for decoration
  • ½ cup of hemp seeds
  • 2 TBL of melted coconut oil, organic (more for greasing if not using muffin baking cups)
  • 1 TBL of organic honey
  • 1 TBL of maple syrup
    • Note: you can use 2 TBLs of honey or maple syrup instead of a combination of them
  • Dash of pink Himalayan salt
  • ½ TBL of baking powder
    • Note: you can substitute the baking powder for 1 ½ tsp of unfiltered apple cider vinegar with ¾ tsp of baking soda (but entire batter will need to be baked right away)
  • Dash of turmeric (optional)
  • ½ tsp of cinnamon (optional)
  • ½ tsp of pumpkin spice (optional)

Directions

  1. Preheat oven to 400◦F (200◦C).
  2. Grind almonds and oats if needed ahead of time, chop walnuts, mash the bananas and set aside.
  3. Add the eggs to the mashed bananas and mix well until eggs are incorporated. Add the melted coconut oil and almond butter and mix until combined. Mix in remaining ingredients.
  4. Line muffin pan with baking cups (or use coconut oil to grease the pan).
    • Note: if greasing the pan with coconut oil and not using muffin baking cups, you will need to carefully remove the muffins (with a rubber spatula or a knife) as soon as they come out of the oven, otherwise they will stick to the pan as they cool.
  5. Fill muffin pan and sprinkle whole oats on top for decoration (optional).
  6. Bake 400◦F (200◦C) for 15 minutes or until muffins are golden brown.
  7. Since this recipe uses natural and more perishable ingredients, it will not last more than a couple of days outside of the fridge. You can also freeze the remainder of the muffins if not serving them all right away (wrap them well and freeze, you can thaw it out in the fridge overnight or at room temperature for several hours).

I hope you enjoy this super healthy muffin recipe!

Posted in Breads, Brunch/Breakfast, Cakes, Desserts, Gluten-Free, Healthy Cookture, Light Dishes, Snacks | Tagged , , , , , , , , , , , , , , , , , , , , , , , , | Leave a comment

Healthy High-Protein Granola (Naturally Sugar-Free and Gluten-Free)

©2017 Food Cookture – Healthy High-Protein Granola (Naturally Sugar-Free and Gluten-Free)

Granola is often thought of as a “health food” however, store-bought granola is full of sugar, fat, and preservatives. Most homemade recipes are only healthier in terms of cutting preservatives, but are also full of sugar, and even the “healthy” versions use large quantities of maple syrup or honey which still leaves the granola with a high sugar content.  I recently found a recipe that calls for egg whites to bind the granola instead of using maple syrup, honey, brown sugar, or any other sugar to caramelize and work as a binding agent and wanted to give it a try.

I also recently came across the granola recipe from Eleven Madison Park (ranked #1 in the World’s 50 Best Restaurant for 2017) and couldn’t wait to try it.  However, being a restaurant recipe, I knew it would taste amazing despite having high content of sugar and fat, so I started with the healthy high-protein recipe that uses egg whites instead of sugar as a base recipe, and added some of the ingredients found in the Eleven Madison Park’s recipe for taste.  I also decreased the amount of olive oil in Eleven Madison Park’s recipe from 1/3 cup to 2 tablespoons; I knew the olive oil would give the granola depth in flavor and I wanted a little bit of that without all the fat.  I made a few substitutions based on my favorite granola ingredients to come up with the recipe below: I added almonds and cashews to the pistachio mix, and used ¼ cup of dried cranberries instead of ¾ cups of dried sour cherries (dried fruits have high content of sugar, so I opted to use less in my recipe).  The healthy recipe yields 3 cups of granola, while the Eleven Madison Park yields 6 cups; with my substitutions, my recipe yields 4 ¼ cups so I adjusted for cooking time and temperature.  While the healthy sugar-free granola recipe says to bake at 225◦F for 1 hour, the Eleven Madison Park recipe says to bake at 300◦F for 35-40 minutes.  I decided to bake my recipe at 250◦F for 45 minutes, but depending on your oven you may need to cook a little longer.

©2017 Food Cookture – Healthy High-Protein Granola (Naturally Sugar-Free and Gluten-Free)

This recipe is healthier than the average granola recipe, it’s not sweet since there is zero sugar added (with the exception of dried fruit), but it’s still delicious. If you want yours a little sweeter, you can always add honey to it before serving it, although I’ve found that when eating it with fresh fruit and yogurt or milk (or almond milk) there is no need to add any sugar to it at all.  The wonderful thing about a granola recipe is that you can add anything you like to it. So take the recipe below as a simple guide and have fun creating your own version! The healthy egg-white recipe says to use 1 egg white per 1 cup of dry ingredients… I went a little overboard with adding ingredients but my recipe still turned out fine.

©2017 Food Cookture – Healthy High-Protein Granola (Naturally Sugar-Free and Gluten-Free)

Healthy High-Protein Granola (Naturally Sugar-Free and Gluten-Free)
Recipe adapted from Super Healthy Kids and NYT’s article on Eleven Madison Park
Yields: 4 ¼ cups
Prep time: 8 minutes
Cook time: 45 minutes

Ingredients

  • 2 cups of oats (gluten-free, steel-cut, not instant)
  • 1/3 cup unsalted raw or dry-roasted pistachios
  • 1/3 cup unsalted raw cashews or pecans, broken into bits
  • 1/3 cup unsalted raw almonds slices
  • ¾ cup unsweetened coconut flakes or chips (can be added after baking)
  • ¼ cup pumpkin seeds (optional to add sunflower seeds too)
  • ¼ cup dried cranberries, or other dried fruit (can be added after baking)
  • 2 Tablespoons extra virgin olive oil
  • Dash of cinnamon (you can add more to naturally “sweeten” the granola)
  • ¼ – ½ teaspoon of Himalayan salt
  • 3 large egg whites

Directions

  1. Beat egg whites in mixer until stiff peaks form; about 5 minutes. Reserve.
  2. Mix all dry ingredients (except dried fruit), add olive oil and egg whites and continue to gently mix until egg whites are completely incorporated.
  3. Spread mixture on a cookie sheet that is covered with parchment paper or silpat.
  4. Bake 250◦F for 45 minutes until light golden brown. Stir once or twice during baking.  If you prefer chunkier granola pieces, then do not stir at all.
  5. Allow granola to cool completely before storing in air-tight container for 1-2 weeks.

I hope you enjoy this healthy and naturally sugar-free granola recipe!

Posted in Brunch/Breakfast, Desserts, Gluten-Free, Healthy Cookture, Light Dishes, Snacks | Tagged , , , , , , , , , , , , , , , , , , , , , , , , | 2 Comments

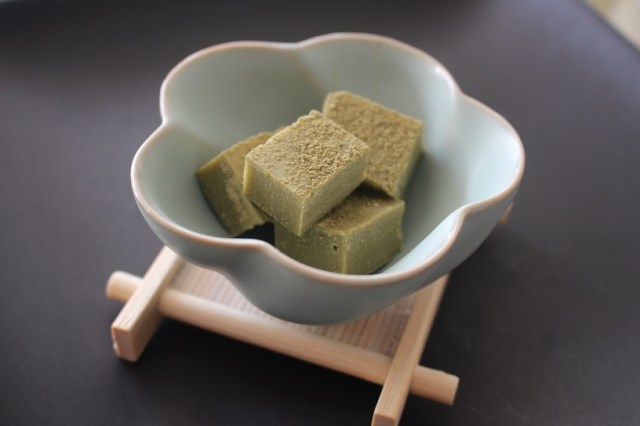
Green Tea Matcha Chocolate

Green Tea Matcha Chocolate

©2017 Food Cookture – Green Tea Matcha Chocolate

The last recipe I posted was for homemade Japanese Nama Chocolate – and I thought the “matcha” version would just be a change in a couple of ingredients.  Boy, was I wrong!  The recipe is just as simple but it deserves its own post because it tastes THAT good.  Out of all the green tea desserts I’ve ever had, this is by far my favorite!

Green Tea Matcha Chocolate2

©2017 Food Cookture – Green Tea Matcha Chocolate

Green Tea Matcha Chocolate
Recipe from Just One Cookbook
Serves: Approximately 40 small units
Prep time: 25 minutes
Cook time: 5 minutes
Chilling time: 4-5 hours

Ingredients

  • 400g (14oz) good quality white chocolate
  • 125ml (1/2 cup) heavy cream* (I used organic “heavy whipping cream”)
  • 25g (2 TBL) unsalted butter
  • 1-2 TBL of green tea matcha powder (plus more for sprinkling).

Directions

  1. Cut the white chocolate into small pieces using a sharp knife (the smaller the better, it will melt faster). You can also use a food processor and pulse a few times to cut the chocolate into small pieces. Put chopped chocolate into a heat-resistant bowl and set it aside.
  2. Cut the butter into small pieces and add to the chocolate, set aside.
  3. Heat the cream in a small saucepan over medium heat until it starts forming small bubbles around the pan but do not boil the cream – if the cream is too hot it can burn the chocolate.
  4. Pour hot cream over the chocolate and butter and mix right away (white chocolate has a different composition than dark chocolate so the instructions are slightly different). If the chocolate hardens before it is melted, heat a small saucepan with water and put bowl with chocolate over it and stir continuously until all chocolate is melted.
  5. Sift the green tea matcha powder into the chocolate mixture and stir. You can try adding 1 tablespoon at a time and check on the matcha flavor.
  6. Line an 8”x8” (20cm x 20cm) dish with parchment or wax paper. Pour the chocolate and smooth the top with a spatula. Refrigerate for at least 4-5 hours.
  7. Remove the parchment/wax paper from the chocolate and cut into small pieces using a warm knife (run knife under hot water and dry it before using). You may need to clean the knife blade between each cut.
  8. Sift more matcha powder over the chocolate, and roll the chocolate pieces so all sides get covered in matcha.
  9. Serve immediately or chilled. I prefer to serve at room temperature, but they are good even out of the fridge. The chocolate should be stored in the refrigerator and best consumed within a few days.

I hope you enjoy this decadent green tea treat!

Posted in chocolate, Desserts, Gluten-Free, Snacks | Tagged , , , , , , , , , , , , , | Leave a comment

Homemade Japanese Nama Chocolate

©2016 Food Cookture – Nama Chocolate

©2016 Food Cookture – Nama Chocolate

My friend Luciana who lived in Japan for many years recently invited me over to serve a very special Japanese tea she received as a gift from her husband. I was very excited to try this tea, but little did I know I would also be introduced to a new recipe when she served us Nama Chocolate.  As with anything Japanese, these little bites of chocolate were beautifully presented.  They were delicate pieces of chocolate and I could have easily devoured the entire little box but restrained myself since I was her guest after all.  She wanted me to try them so I could also learn to make them and gave me a few recipes.  I couldn’t wait and looked over a few recipes she sent me and the next day I eagerly made them.  I love how easy they are to make and will replace my traditional chocolate truffle recipe for these since there’s no rolling chocolate and washing hands in between every few truffles.

©2016 Food Cookture – Nama Chocolate

©2016 Food Cookture – Nama Chocolate

“Nama” means fresh or raw in Japanese and nama chocolate is named for its use of fresh cream.  There are only two main ingredients: chocolate and fresh cream (and in some recipes, also butter).  You can also add a little bit of liquor or Champagne to the chocolate.  They are dusted with cocoa powder to finish.  There’s also matcha nama chocolate that is made with white chocolate and matcha (powdered green tea).  I decided to try the dark chocolate recipe with cocoa and saved some to try with matcha on top.  The recipe I tried (as with many others I compared) has a ratio of 2:1 chocolate to cream, and uses no butter.  Simple and easy to remember.

©2016 Food Cookture – Nama Chocolate with Matcha

©2016 Food Cookture – Nama Chocolate with Matcha

Homemade Nama Chocolate
Recipe adapted from Just One Cookbook
Prep time: 25 minutes
Cook time: 5 minutes
Chilling time: 4-5 hours

Ingredients

  • 400g (14oz) good quality chocolate (I used dark chocolate with 70% cacao, you can also use semi-sweet chocolate if you prefer)
  • 250ml (8.5oz) heavy cream (I used organic “heavy whipping cream”).  Click here to see Types of Cream (Note: recipe updated to add more cream)
  • 1-2 Tablespoons of good quality cocoa powder (you can also use matcha)
    • For flavored Nama Chocolate: add any spice, vanilla, or orange peel to the cream.

Directions

  1. Cut the chocolate into small pieces using a sharp knife (the smaller the better, it will melt faster). You can also use a food processor and pulse a few times to cut the chocolate into small pieces. Put chopped chocolate into a heat-resistant bowl and set it aside.
  2. Heat the cream in a small saucepan over medium heat until it starts forming small bubbles around the pan but do not boil the cream – if the cream is too hot it can burn the chocolate.  Add flavorings, if using any.
  3. Pour hot cream over the chocolate and let it sit for a few minutes. You can also put the chocolate into the saucepan of cream, but I prefer to remove the cream from the pan in case the cream was overheated. After a few minutes, use a whisk to stir the chocolate until creamy and smooth.
  4. Line an 8”x8” (20cm x 20cm) dish with parchment or wax paper. Pour the chocolate and smooth the top with a spatula. Refrigerate for at least 4-5 hours.  Tip: If you wait longer than 5 hours, the chocolate may need to stay at room temperature for a little while before cutting. I refrigerated mine overnight and cut it straight out of the fridge and it broke when I cut it. Not as pretty presentation as the true Japanese nama chocolate, but I called it an artistic version to save my nama chocolate.
    • Recipe update: I added more cream to the recipe so the chocolate is not as hard even when refrigerated, and thus more similar to the traditional Nama Chocolate.
  5. Remove the parchment/wax paper from the chocolate and cut into small pieces using a warm knife (run knife under hot water and dry it before using). You may need to clean the knife blade between each cut.
  6. Sift cocoa powder (or matcha) over the chocolate, and roll the chocolate pieces so all sides get covered in cocoa.
  7. Serve immediately or chilled. I prefer to serve at room temperature, but they are good even out of the fridge. The chocolate should be stored in the refrigerator and best consumed within a few days.

I hope you enjoy this easy and decadent chocolate treat!

Posted in Brunch/Breakfast, chocolate, Desserts, Gluten-Free, Snacks | Tagged , , , , , , , , , , , , , , , , , , , , | 4 Comments